
Do you want to paint your Rinnai heater but are concerned about doing so? This post hopes to answer your question.
A Rinnai heater can be painted. However, for your own safety, ensure that the wiring is not damaged. You should also choose a paint that will adhere to the heater.
This article will show you how to paint a Rinnai heater. We’ll go over some risks to be aware of and what you can do about them.
Is It Possible To Paint A Rinnai Heater?
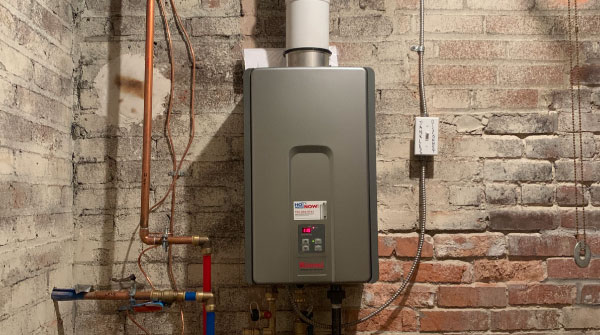
To give your Rinnai heater new life or to help it blend in with its surroundings, you may want to paint it.
Painting the heater is not a problem because the protective case protects the internal components. However, you should not paint the small temperature display screen.
Before you start painting, there are a few things you should think about. They are discussed further below.
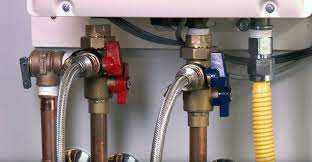
Wiring
Before painting your Rinnai heater, make sure it is in good working order. Examine the wires for faulty components that require immediate repair. To resolve wiring issues, you should first repair the damaged wiring or seek assistance from an HVAC technician. Cover the wires, as they may cause problems if they come into contact with the paint.
Paint Style
It’s critical to understand what kind of paint you can use. Here are some paints to consider:
Enamel
Oil-based enamel paint adheres well to hard surfaces. Enamel paint, on the other hand, may take longer to dry and settle.
Paint For Radiators
Radiator paint can withstand temperatures of up to 750 degrees Fahrenheit. Radiator paint can be used on your water heater because it will not peel off even if the heater gets hot during normal use.
Do You Require Primer?
When painting the water heater, it is best to use a primer. Primer improves adhesion and forms a protective layer that can help prevent premature peeling.
How Long Is the Warranty On A Rinnai Water Heater?
The Rinnai tankless water heater is covered by a one-year warranty against system malfunction and defects. When you register the product within 90 days of purchase, you can extend the warranty for up to five years.
You should read the warranty in its entirety. Painting the water heater may void the warranty in some cases.
How Much Paint Will You Require?
A gallon of paint should be sufficient to cover a single unit. However, the actual quantity will vary depending on the mode of paint application you choose. If you spray paint the unit, you may use less paint.
Painting A Rinnai Heater
If you’re determined to paint the Rinnai heater, proceed as follows:
- Allow the unit to cool for a few minutes after turning it off.
- Protect the adjacent objects and walls from paint by using tape and plastic. Cover the heater’s labels as well. You don’t want to cover up any important information.
- Clean the Rinnai heater to remove any dirt that could interfere with paint adhesion.
- To roughen the surface, use a scouring pad.
- Clean the unit once more with water.
- Allow the primer to dry after application.
- To check the quality of the paint, test it on a piece of cardboard.
- Paint the Rinnai unit if the quality is satisfactory.
- Allow the paint to dry.
- Before turning on the unit, remove the tape and plastic coverings.
The Dangers Of Painting A Rinnai Heater
It is critical to understand how paint may affect the unit. Here are some potential hazards.
Strong Smell
Even after it has dried, paint can emit a strong odor. To prevent this from happening, you should inspect the paint quality.
Corrosion
The external structure of the unit may become hot as it heats up. The unit’s hot temperature can cause the paint to peel off after a few weeks or months.
Check the quality of the paint and its ability to adhere to reduce this risk.
The Typical Lifespan Of A Rinnai Heater
Depending on product quality and usage, a Rinnai water heater can last up to 20 years. When not in use, keep the unit clean and allow it to cool down.
How To Care For A Rinnai Heater
Maintaining your Rinnai heater will help it last longer. It will also keep you safe while operating the unit. Consider the following maintenance suggestions.
Temperature Controls
When setting the temperature on the Rinnai water heater, you should not go above 120 degrees Fahrenheit to avoid scalding and to maintain comfort. Setting the heater to an excessively high temperature may cause long-term damage to the system.
To adjust the temperature, follow the steps below:
- Unplug the unit before proceeding for your own safety.
- Remove the front cover by unscrewing the screws hidden behind the plastic tabs on the four corners of the plate.
- The dip switches can be found in the bottom right corner, beneath the label.
- Locate and activate the dip switch. If necessary, use a small screwdriver.
- Replace the front cover and reconnect the plastic tabs.
- Reconnect the device.
Cleaning The Filter
The filter safeguards the heater’s internal components, ensuring peak performance. To remove the dust, debris, and chemicals that accumulate over time, clean the filter.
Flushing
Flushing entails draining the residual chemicals, such as scale or lime, that accumulate as a result of regular use of the unit. You can do it yourself, but it may be better to hire someone to do it for you.
Mineral buildup in a tankless water heater can erode the walls of the heating chamber over time. It is critical to flush those mineral deposits at least once a year in order to properly maintain and clean your water heater.
What Is The Price Of A Rinnai Heater?
A new Rinnai heater can cost between $1,000 and $2,000, depending on size. You should select the most cost-effective unit without sacrificing product quality. However, you must strike a healthy balance between performance and cost.
To avoid purchasing a counterfeit unit, purchase your Rinnai heater from an authorized dealer and inspect the product label.
Painting A Rinnai Wall Heater
A Rinnai wall heater allows you to keep your home at a comfortable temperature.
Because the unit is portable, paint it outside to avoid dripping paint on the floor. Simply follow the steps below:
- Turn off the unit and wait a few minutes for it to cool down.
- Turn off the breaker.
- Take the unit outside and unplug it. Depending on the installation, you may need to loosen the nuts at the bottom of the unit to remove it from the floor.
- Prepare the area where the unit will be painted. To avoid spilling paint on the ground, lay down old newspaper or plastic.
- To protect the internal system, cover the wiring and the filter.
- Scuff up the surface with a scuffing pad.
- Begin painting.
- Allow the unit to dry completely before reinstalling it.
Painting A Rinnai Air Conditioner
Painting a Rinnai air conditioner can be trickier than it appears.
Because the outside of the casing is usually smooth, the paint may not adhere.
Follow these steps to paint the air conditioner:
- Turn off the unit and cover the wires, air filters, and surrounding area with a cloth.
- Prepare the primer and paint. Canned paint is an excellent choice for quick application.
- Scuff the exterior with a scuffing pad.
- The air conditioner should be painted.
- Allow the paint to dry before powering on the unit.
Conclusion
This article discussed the considerations to make when painting a Rinnai heater. We also discussed the various types of paint available and how to properly paint the unit.


GIPHY App Key not set. Please check settings